Views: 2
In previous blog, we get to know how to create a Team via Admin desktop client. In this one, let’s explore to create a Team via Power Shell.
Some t-shooting steps are also added in case you get an issue, which you most likely will.
Open PowerShell window from Admin desktop and run it as Administrator.
- Run cmdlet to connect the MS TEAMS.
Connect-MicrosoftTeams
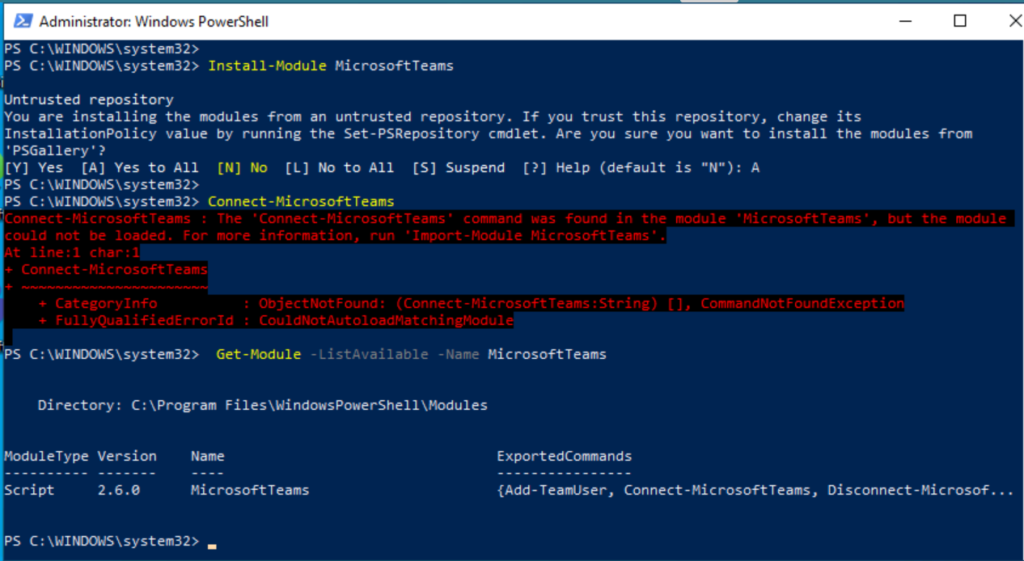
PS C:\WINDOWS\system32> Install-Module MicrosoftTeams
Untrusted repository
You are installing the modules from an untrusted repository. If you trust this repository, change its
Installation Policy value by running the Set-PSRepository cmdlet. Are you sure you want to install the modules from ‘PSGallery’?
[Y] Yes [A] Yes to All [N] No [L] No to All [S] Suspend [?] Help (default is “N”): A
à It gives an error message that module was not found. Error in red in below image.
- Run cmdlet to install the MS TEAMS module
Install-Module MicrosoftTeams
It will install module from PS Gallery. Type A for Yes to All.
Still getting same error- module not found.
- Run the cmdlet to check available modules
Get-Module -ListAvailable -Name MicrosoftTeams

PS C:\WINDOWS\system32> Get-Module -ListAvailable -Name MicrosoftTeams PS C:\WINDOWS\system32> C:\WINDOWS\system32>
- Try to Install the module again. Now, module will be Imported.
Still issue persists, can’t run Connect-MicrosoftTeams.
Let’s try another command:
Relaxing the execution policy fixed the problem for me
Set-ExecutionPolicy -ExecutionPolicy RemoteSigned
Command ran successfully and then Connect-MicrosoftTeams also ran successfully and pop-up Sign in page appears for Admin login.
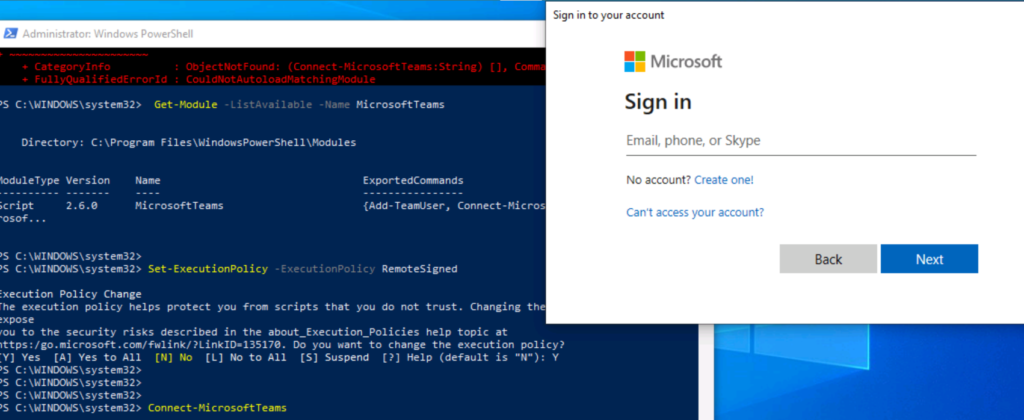
Now, the module is imported and connected, and Admin logged in successful.
Well done! 1st step is successful with learning and some troubleshooting. Now, create teams, add members and create channels via PoweShell.
- Create a new Team- CA-Office
Run cmdlet from the PowerShell window to create the new team CA-Office
New-Team -Displayname “CA-Office” -MailNickName “CA-Office” -Visibility Public
- Add members to the Team
Get-Team -Displayname “CA-Office” | Add-TeamUser -User VinodD@<YourTenant>.onmicrosoft.com
- Create a channel Support in the CA-Office team by using the following cmdlet:
Get-Team -Displayname “CA-Office” | New-TeamChannel -DisplayName “Support”
- Create another channel Recruiting in the CA-Office team by using the following cmdlet:
Get-Team -Displayname “CA-Office” | New-TeamChannel -DisplayName “Recruiting”
- Create a private channel Administration in the CA-Office team by using the following cmdlet:

- New Team- CA-Office is created as checked on desktop client of Administrator.
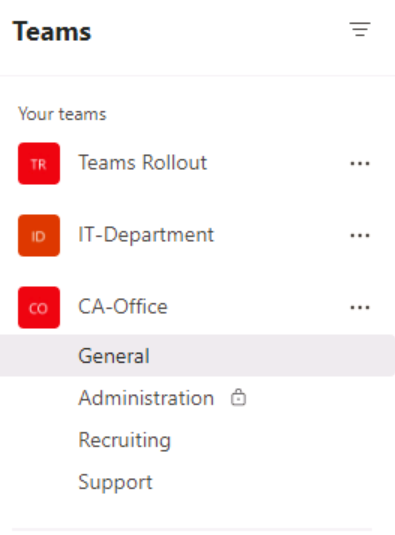
- Admin is a member and owner of the new CA-Office team, where you can see a private channel below, named “Administration”.
- You finally created a team named CA-Office with the members.
- Note that you did not specify any owner in the PowerShell cmdlet but as we ran all commands in PowerShell from Admin system/account, he/she is owner automatically.
- Support and Recruiting are public channels, Administration was created as the private channel.
Finally, creating team and creating channels with member addition is successful via PowerShell.